Showing posts with label pumpkin. Show all posts

Sunday, October 14, 2012

The Homestead Hoagie: Pumpkin Marinated Tofu & Homestead Bread

It may not be much, but I used half the arugula, an heirloom tomato, a little cilantro and some pantry items to make...The Homestead Hoagie!  I desperately needed to make a protein and a grain to tag along with the veggies.


Let's get right down to work, I'm all tuckered out!

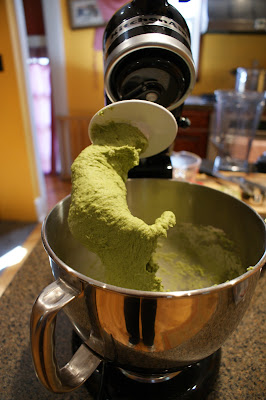
Green Monster Bread with Pumpkin Marinated Tofu (recipe below), Heirloom Tomatoes and Organic Cilantro (produce is all CSA).


This recipe is an approximate recreation of the recipe I made on Friday night.

Pumpkin Marinade (for tofu, tempeh or seitan)

1 clove garlic, chopped or pressed
½ a can (or 1 cup) canned pumpkin or cooked pumpkin or squash
2 T organic sunflower oil
1 ½ tsps hot chili oil
2 T maple syrup (Grade B preferred)
1 tsp organic tamari
1 tsp Kosher Salt
1/8 tsp ground cinnamon
1/8 tsp garlic powder
1 ½  cups organic apple juice and/or pumpkin beer
*I used apple juice, haven’t tested yet with the beer, but I think it would be great.

I add the marinade directly to  a 5 cup (1.2 L) tupperware container.  Whisk well with the Mini Whisk O’ Doom, see below, (or use a fork).  Add pressed tofu (I use a TofuXPress, and I love it) cut into large triangles, tempeh (slice it into quarters and steam it for 10 minutes before adding to marinade), or seitan (best added warm from the pan, but OK if not).  I used one package (one pound) of pressed tofu but could have fit another half package in. 

Top off with apple juice, apple cider or pumpkin (or other beer, stoudt would be great) beer until just covering tofu, tempeh or seitan.  Cover tupperware tightly and shake gently to mix.  Store in refrigerator for up to two weeks, shaking gently (I invert the whole container a few times, holding the top on tightly!) when you think of it to mix it.  Use the tofu/tempeh/seitan right out of the marinade and add more protein to it if you want.  I always do this with marinade for vegan foods, and it’s always fine.  Let sit for at least 12 hours or overnight before using, shaking gently when you think of it.

Ain't she purdy?

To sautè tofu as pictured below, heat a well seasoned cast iron pan for 3 minutes on medium heat.  Then, add about 1 tsp of olive oil to pan and swirl around to coat heat oil for about 10 seconds.  Add tofu, leaving on whatever marinade is sticking to it.  Cook 4-5 minutes on the first side until golden, flip, cook about 3 minutes on the second side, again, until golden brown.  Serve for breakfast, lunch or dinner! Would be great on a sandwich as pictured, in a breakfast wrap or as the “egg” main with some tempeh bacon and potato hash, with a side of sauteed greens and cornbread for dinner, etc. 

You can also cook down the marinade into a sauce to serve over your tofu et al.  


Enjoy! We loved this marinade.  So glad it percolated in my cowboy hat in time for MoFo! 

Now, the bread, what’s the recipe for the bread?  Well, I used the recipe for Green Monster Bread in Tami & Celine’s new book, Vegan Sandwiches Save the Day!  


It's fantastic, put one in your cart the next time you stop by the ol' trading post.

I doubled the arugula (since I had so much) and I used white whole wheat flour (instead of AP) and it was no worse for wear!  In fact, I think she liked the extra greens and that WWW flour mighty fine.


 Two green monsters!


 The Sheriff's at it again!

 You might not know it, but she was all green in the gills!

 She was down right delicious!
 A snack.


Pumpkin Marinated Tofu, well I'll be!  Keep it dry* now, ya' hear?


Homesteadin' it October 1st through October 31st, 2012

*keep it dry=keep it secret, keep it safe.

Wednesday, October 3, 2012

Curried Cream of Pumpkin Soup

FYI: After this post, there will be no more pumpkins on the Homestead!  We are moving on to other things.  Drying! Canning! Tomatoes! Jalapenos! Figs! Cool weather crops! A weird present from Pa! 


Curried Cream of Pumpkin Soup with Tamari Roasted Pepitas and Chickpeas and Fresh Organic Cilantro

I had this for lunch again yesterday and it was delicious.  I love transforming my CSA haul into such useful fare!

Curried Cream of Pumpkin Soup
1 Sweet Onion, Chopped
3 Cloves of Garlic
1/4 Jalapeno (no ribs or seeds) chopped
3 tsp Maharajah Curry Powder (or whatever curry you like) I like Penzeys brand.
2 tsp Poultry Seasoning (Again, Penzeys for me)
1/2 to 1 tsp Freshly Dried Sage
 *I dried my own sage, we'll do home dried herbs tomorrow!
1/2 tsp Freshly Dried Thyme (sorry, tomorrow, guys!)
1 tsp Kosher Salt
1/8 to 1/4 tsp Nutmeg
2 Tbs. Tamarind Concentrate or Fresh Lime Juice
*Your Asian market should have it.
1 can Light Coconut Milk (you can use full fat if you want)
1 Quart Veggie Stock (homemade or store bought)
Optional (to add creaminess): 1/4 cup vegan sour cream or vegan cream cheese 

Garnish with: Fresh Chopped Cilantro & Tamari Roasted Chickpeas & Pepitas 


If you haven't yet roasted your pumpkin (shame, shame!) you can roast it while you are making the soup base.  Saute the onion, garlic & jalapeno in a large pot (I use an 8 quart stock pot) over medium heat in about 2 tablespoons of olive oil until translucent, about 5-7 minutes.  Add the spices (curry through nutmeg) and stir to coat the veggies and toast 2-3 minutes longer to toast the spices.  Add the tamarind concentrate (or lime juice), coconut milk and stock and let simmer while the pumpkin is roasting. Or, if you already have a roasted pumpkin or are using *gasp* canned pumpkin (I'd say about a can if you MUST) this is about 45 minutes, but I'm sure it only needs about 30 minutes of simmering, really.  Stir occasionally, until volume is reduced by about 1/3.  Once your pumpkin is done, add the pieces to the soup base and simmer for about 10 more minutes to allow the pumpkin to infuse with the soup.

Transfer to a blender (or your VitaMix if you've got one!) in about 3 batches (since it is very hot), put a towel over the lid in case hot liquid shoots out, and blend until smooth.

Serve garnished with chopped fresh cilantro (if you like cilantro, I LOVE it), and Roasted Pepitas and Chickpeas, por supuesto (of course!).

As Jacques Pepin always says, the garnish is an integral part of the soup, it is meant to be served with it, and isn't complete until garnish is added.  Good thing you already made your garnish!  You're done.


And now, let's get out into the garden, and see what else we need to do...


Vegan Fazool is Homesteading it! October 1st through October 31st, 2012.

Tuesday, October 2, 2012

Home Roasted Pumpkin and Perfect Pepitas!

Homesteaders, it's pumpkin season!  Never fear, this is no typical pumpkin post.  You are about to learn the secret of The Home Roasted Pumpkin and THE recipe for Perfect Pepitas.

You want to make something with fresh roasted pumpkin from scratch, and really, who doesn't?  And you don't want pumpkin pie.  At least pretend you aren't feeling that pumpkin pie for a second, OK?  (It was hard for me, too, but I love all things pumpkin, so no problem, I moved on).  What you want is a nice, Curried Cream of Pumpkin Soup with Tamari Roasted Pepitas & Chickpeas.

Just remember that.

My Organic CSA Pumpkin, pictured with fresh sage and green beans.

Why roasting a pumpkin is homesteading:
Many times you need to prepare food before you can use it or store it.  I got this pumpkin in my CSA and I didn't want to waste it.  I'd never actually roasted a pumpkin before this!  I use canned pumpkin to do all my pumpkin breads and desserts (which I love, as you may know).  The big pumpkin sitting there on my counter tried to intimidate me with typical evil pumpkin dialogue, "I will take forever to make!" "I have only ever truly longed to be a Jack O'Lantern!" And, "What ever happened to that watermelon from four weeks ago?"  

Roasting a Pumpkin: So, it's not too hard to roast a pumpkin.  Just think of it as a big squash! You pretty much cut it in half and roast it.  Snap off the stem first, then cut on either side of the stem around and through the pumpkin.  Then, put your knife through the center of the stem and push down slowly, it will halve pretty easily.  The Vegan Zombie has a nice illustration of it in this video starting at 1 min 18 sec.  Scoop out the seeds and stringy flesh, and set them aside--preferably in a big bowl so you can cover them with water (see below) and then make your roasted pepitas.  Anyway, brush the inside of the pumpkin with a little olive oil, sprinkle with salt, and roast at about 400 degrees (you can do up to 450 if you want) for about 45-60 minutes or until a fork easily pierces the pumpkin.  While your pumpkin is roasting, prepare your seeds (see below).  Let it cool a bit, then, scoop the flesh from the skin, or just peel the skin off.  
Done.

I quartered mine to help it cook faster.  This was done at 400 for about 45 minutes.

Let it cool until you can handle it and then scoop out the flesh and discard the skin.  

Now you have delicious roasted pumpkin with which to do as you please.  If you want to can it, go for it! I'm not sure, but I may attempt a canned pumpkin pie filling if I can get another organic pumpkin (I'd never seen them before the one I got in my CSA).

And NOW, turn your oven down to the "warm" or "hold" setting, or just put it on the lowest temp you can...

Perfect Pepitas (Pumpkin Seeds)? Yes, please!

Why Roasting Pumpkin Seeds is Homesteading: 
Using all the edible parts of a seasonal vegetable is important to reducing waste on the homestead!  Guys, I never made really good roasted pumpkin seeds before.  Though they had good flavor, they were always chewy and the texture and consistency was never right. So, just because they were edible doesn't mean they were good.  Enter my new method that makes them GREAT. And, honestly, if food isn't that great, we are less likely to eat it and it is much more likely to go to waste.  

First trick: take your pumpkin seeds covered with pumpkin gunk and put it in a pretty big bowl and cover with water.  Mix it around with your hands, loosening the seeds from the flesh.  Seeds will float to the top and you can just skim them off with a slotted spoon!  Good trick, right? I thought of it from doing pomegranate seeds in the water just like that.

 Now...

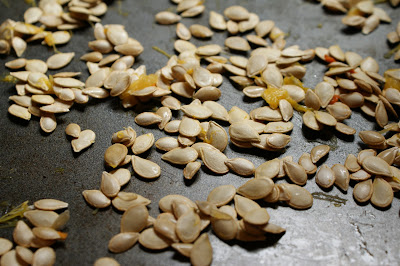
Second Trick:  This is the most essential trick to delicious, crisp-tender pumpkin seeds! You must dry them out first in a very low oven before roasting them. My oven has a "hold" or "keep warm" setting, and that is what I used.  Spread your seeds sans gunk out on a baking tray.  Don't line it with foil or a Silpat, it's easier to go right on the tray, if they stick, you just scrape them right off with a rubber spatula.

 Dry out on your "warm" setting or up to 200 degrees or so for one hour or longer, stirring about every 20-30 minutes or so, until the seeds look and feel dry, but are not starting to toast. Then, I just let mine sit in the oven until I was ready to roast them.  It turned out that they sat in there for two days before I roasted them and they were perfectly fine (and not stale or anything).

The seeds must look dry and feel dry for this step to be considered complete.
Most of the seeds in this shot are dry.

Third Trick: Flavor your seeds!  When you are ready, remove dried seeds from tray, put in a bowl with olive oil, salt, and whatever other seasonings you feel like.  I just did some with Cholula hot sauce, agave syrup, salt, olive oil and a squeeze of lemon.  You can make them sweet with cinnamon & sugar and a squeeze of fresh orange juice, or you can use ginger, garlic, curry powder, whatever.  And, of course, the classic olive oil & salt combo is always great.

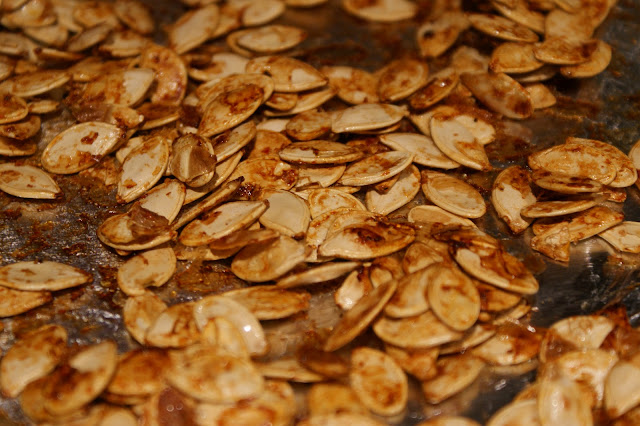
Roast in a low oven (300 degrees) for 20-45 minutes, depending on the toughness of your seeds.  (I did line my tray with foil for this.)  I only had to do my smallish, tender organic CSA pumpkin seeds for 20 minutes and they were done.  Don't forget to stir them up and check on them every 15 min. or so.

Seriously these were amazing.

So crispy and tasty! Not chewy or tough! Huzzah!

 OK, so now you can use your roasted pumpkin for the soup (or for anything else!), and roasted pumpkin seeds for a garnish (or for a snack!).  For fun, you can also make some Tamari Roasted Pepitas and Chickpeas for a super fine soup garnish or high protein snack.

Tamari Roasted Pepitas & Chickpeas

About 2 cups cooked Chickpeas
*A whole can if you like! make sure to drain & rinse them if you use canned ones.
1/2 cup (or more! whatever you want) of Raw Pepitas (pumpkin seeds)
*dried out in a low oven--see above--if you are homesteadin' it and using fresh-from-the-pumpkin-seeds)
1 Tablespoon Sesame Oil
1 Tablespoon Olive Oil
1 Tablespoon Organic Tamari
Sprinkle of Salt
Few shakes of Garlic powder
Squeeze of Lemon

Put everything in a bowl and mix up until all the chickpeas and pepitas are well coated.  Roast in a single layer on a baking sheet at 400 for about 20 minutes, you can put them in when you take out your pumpkin, if you have already dried out your pumpkin seeds. Stir halfway through to roast everything evenly.

These are super addictive.

But, what's that? You still want to make the Curried Cream of Pumpkin Soup? No problem.

Stay tuned!


Monday, September 24, 2012

Dawn's BEST EVER Pumpkin Bread

You would never know it's high protein and whole grain.  Let's just do this, right?

Dawn's BEST EVER Pumpkin Bread
Inspired by the Pumpkin Spice Bread in The Joy of Vegan Baking.

Yields 2 loaves.
*However, I could go for two bigger loaves, so I do want to work to increase this recipe by about 25%.
As usual, use as many organic ingredients as you like.  Notes are denoted with a *.

1/4 cup Ground Flaxseed
1/2 cup Water
2 cups Sugar 
*or natural sugars such as date sugar, coconut sugar, etc. but I haven't tried it with these, so let me know.
1/3 cup Sunflower, Safflower or Canola oil
2/3 cup Unsweetened Applesauce.
1 can Pumpkin Puree 
*I used Wegmans brand this time and it was great, though not organic!
1 cup Protein Powder (it's OK if it's vanilla flavored)
*I used TJ's soy powder because I had it, and it was great.
2 cups White Whole Wheat Flour
*I only use King Arthur's brand here, it's the best by far.
1 tsp cinnamon
1/2 to 1 tsp nutmeg
1/2 tsp allspice
1 tsp baking Soda
1/2 tsp baking Powder
1/2 tsp Salt
Optional: 1/2 cup of chopped walnuts or chocolate chips per loaf.

Preheat oven to 350 degrees.  Grease and lightly flour two standard loaf pans and set aside.

In a small bowl, whip together flaxseed and water with an electric hand mixer until creamy and "eggy" looking (it will appear a bit gelatinous). You can also do this by hand (vigorously with a small whisk or fork) or in your food processor.  Set aside.

In a large bowl, mix sguar, oil, applesauce, pumpkin, and add the flaxseed mixture (your "wet" ingredients).

In another bowl thoroughly mix your dry ingredients: protein powder, flours, spices, baking soda & powder and salt.  Add them to the wet ingredients and mix with a wooden spoon or strong spatula until combined.  Alternately, to save the additional bowl from this step, I use a large fine mesh sieve that I rest over the wet ingredients.  I then sift in my dry ingredients directly into the wet ones, sort of mixing in all the spices and baking powder & sodas into the flour right in the sieve so it blends evenly into the bread.

If you want a plain loaf, pour half the batter into one of the loaf pans now.  For a nut and/or chocolate chip loaf, add the walnuts to the remaining batter and pour into your second pan.  My son wanted a chocolate chip loaf, so I sort of tricked him by only putting some chips on top of the loaf (there were none inside it).

Bake at 350 for about 50-55 minutes.  Let cool at least 20 minutes before slicing (I cool them on a baking rack still in the loaf pans).

These also freeze beautifully. I just cut fairly large pieces once they are cool and wrap those pieces in foil, label, and freeze.  Just put in the fridge overnight to defrost for an amazing breakfast or dessert base anytime.


What pumpkin recipes have you guys been making? I LOVE fall.

P.S. Vegan MoFo is coming!!  You know, that month long event where hundreds of bloggers sign up and attempt to post 20 times about vegan food in October? And people have lots of fun themes and write tons of posts and complain all month about how hard all that work is, and then are super sad when it's over?  OH YEAH.  Well, it's almost here.  I'm still refining my theme and trying to get my head in the game, but I DID sign up!  It's not too late if you want to sign up, too, you have until Wednesday, September 26th.  You don't need a vegan blog to do it, any blog will do, but your posts need to be about vegan food in some fashion to count for MoFo.

Last year, as my first recipe for Vegan MoFo, I made my Pumpkin Biscotti!

Well, I'll be seeing you guys a LOT soon :-)  Prepare yourselves!

XOXO


Thursday, October 27, 2011

Thanksgiving Trial Run: "Impossible" Pumpkin Pie

Susan from the FatFreeVegan blog created a crustless, "impossible" pumpkin pie that is totally fat free and easy.  All you need is a blender and a pie pan and you are good to go.  For this, I was able to use my sweet rice flour from my pantry, which has made a long-time home in my baking drawer.


Doing the impossible. 


It is custardy with an Asian dessert taste (from the rice flour).  I served it with Soyatoo whipped cream.


All in all, it was good, but sort of tasted too much like the filling of an Asian bakery good and not enough like a pie for me. I used arrowroot, though and didn't reduce the quantity.  Next time I would reduce it to 2 tsps rather than the tablespoon, it is a stronger binder than cornstarch and the full tablespoon affected the consistency.  I also used canned pumpkin, which I'm sure affected the consistency also.  

Give Susan's impossible pie a try! It is really fun to make (and so easy!).  Don't use too much arrowroot and you should be fine :-)

What recipes are you guys thinking about making for the holidays? What's on your "to try" list?

Sunday, October 9, 2011

Pumpkin Ice Cream!

Well, I’ve gone and used all the canned pumpkin in my pantry.  Now, I have to get more! Seriously, it’s on my grocery list for tomorrow. 

Here’s a delicious taste-alike to Bassetts’ pumpkin ice cream, which was one of my very favorites as an omni.  This vegan version is very convincing.  The flavors are right-on.  I used Isa's recipe for vanilla ice cream from Veganomicon as a base and worked from there.  Gotta love Vcon!

Put all of your ingredients (besides the sugar and the spices, obviously) in the fridge the night before or at least a few hours before you make your ice cream!  Make sure your ice cream maker bowl has been in the freezer overnight as well so it’s ready to work.

Ingredients:
One can of organic coconut milk (full fat) you’ll be harvesting ½ cup of the solid cream on top of the coconut milk once it is cold.
1 cup liquid: ½ cup soy milk, ¼ cup coconut milk (from the can where you got the cream!), ¼ cup organic soy creamer (I use Trader Joe’s) OR: you can just use 1 cup of full fat soy milk if you prefer.
¾ cup organic sugar
4 ounces (½ cup) silken tofu.  Hint: this is 1/3 of the 12 ounce brick (full fat, “firm” silken tofu in the aseptic box)
¼ cup full fat soy yogurt (plain or vanilla)
1 tsp cinnamon
½ tsp nutmeg (1/4 tsp if you are afraid of nutmeg)
½ cup of organic pumpkin puree

Just put everything into a blender or food processor and puree it.  I just use my Hamilton Beach blender which I’ve had for almost twenty years and works just as well as those high powered three hundred dollar things!  Anyway, pour the cold puree into your ice cream maker and follow the directions for your specific maker. 

To give it a nice, firm texture, freeze for a few hours longer in a tightly sealed Tupperware container before serving.  And try not to eat it all in one sitting!

Have a great week, everyone.


Saturday, October 8, 2011

MoFo Post #8: Wine, Olive Oil, and Ice Cream

Last night was…Date Night! We had a BABYSITTER, and actually went out to dinner for the first time in four years (I am counting some of my pregnancy, because you cannot drink when you are toting around a developing fetus).  We have done dates during the day while he is at day care, school, etc. but never gotten a sitter for an evening before.  It was quite the revelation.

We got sushi, which I had been craving.  Question: why isn’t there more vegan sushi at sushi places? Like that awesome deep fried silken tofu I always get, can’t you put that in a roll with some avocado and carrots or something? Maybe next time I'll ask them to make me a fried tofu roll.  It was great regardless.

The place was a BYO and so we brought this great, yet very reasonably priced wine (It was a Dry Riesling from Chateau Ste Michelle) so I went crazy and drank two glasses of wine at dinner, and then we went to this store I’d been dying to go to for like months, A Taste of Olive.  I ended up spending $50 on olive oils and vinegar, but to me, that is the best fifty bucks that you can spend.  You can taste all (or at least as many as you can handle) of the oils and vinegars and once you choose one (or more!) they bottle it for you right there and seal it with their fun machine.

Yup, that's my cat's tail on the right, there.

So, the bottles have their logo on one side, and on the other they print out custom labels for whichever ambrosial liquids you chose to go inside:


 My husband's choice.


I needed a great, all-purpose balsamic vinegar.  This was it. I was difficult to go basic with the dozens of amazing vinegars they carry.


My choice of oil.

My husband and I each preferred a slightly different profile to our oils, so we got two.  He chose a Spanish oil, La Trinidad, which was grassy, fruity, and had a sharp, peppery finish that got you in the back of the throat.  I chose Kaldi, a Greek oil that had a lot of fruit up front and a peppery finish that didn’t linger too long on the back of the throat.  Anyway, I’ll get a flavored one next time, but it was so hard to choose, I went for the great all around oil.

So, today, we hit the Farmer's Market and then really wanted to use our new bottles.

Hubby made a fresh vegetable terrine with zucchini, mushrooms, tomatoes and fresh basil:


I mixed in some chickpeas, and some sauteed fresh spinach (hubby also made that, sauteed with leeks, from our farmer's market purchases).  I dressed it with my balsamic vinegar and my olive oil.  Hubby does not like balsamic vinegar, so I made a separate dish.  

We ate these over pasta: capellini dressed with garlic and oil. I'm sure you can imagine a better picture than I could have taken because I was starving!

And then, since it was like 75 degrees (Fahrenheit) today, I made some pumpkin ice cream.  I was trying to get a craving for Bassetts pumpkin ice cream out of my system:

It turned out exactly like my beloved Bassetts, but, better. And vegan.

If you guys want the recipe to either of these, comment below and I'll try to make it happen.

Have a great night (or day)!
<3 Dawn

Sunday, October 2, 2011

Pumpkin Biscotti

Party in the Pantry, Recipe #1: Pumpkin Biscotti

It's not usually hard for me to use up canned pumpkin, I LOVE it and I use it pretty often.  But, what to do with the rest of a can, about 2/3 of a cup of canned pumpkin, leftover after making Isa's pumpkin cupcakes?  I also had use for some raw, organic walnuts in my freezer, as well as an amount of flour bordering on oversupply (I have three, five pound bags) and two bags of Trader Joe's Organic Brown Sugar.

Then it struck me: Pumpkin Biscotti! Here they are:


I arrived at my recipe thanks to the wisdom of  my Italian NonnaBryanna Clark Grogan, whose recipe for almond biscotti served as my guide in this undertaking.  Grazie, nonna!


Pumpkin Biscotti   
Makes about 20 cookies
2/3 c. white organic sugar (organic sugars are vegan)
1/3 c. organic brown sugar (I use Trader Joe’s)
2/3 c. organic canned pumpkin
1 tsp vanilla
¼ tsp almond extract
2 tablespoons organic sunflower oil (or canola, peanut, any other non-olive oil that you like)
2 c. whole wheat white flour (I use King Arthur’s, but it’s not organic)
2 tsp baking powder
¼ tsp salt
½ tsp cinnamon (I lost my Vietnamese cinnamon from Penzey’s during the hurricane!)
1/3 c. organic, raw walnuts (Trader Joe’s again for me)
1/3 c. chocolate chips (Wegmans or any other non-dairy brand)


Preheat oven to 350 degrees.  Grease a shiny cookie sheet or jelly roll sheet, or cover a dark one with greased aluminum foil.  You can also use a Silpat on your baking sheet as I did.  I just about fit everything on one 9 x13 sheet, but I could have used the room of two sheets, really.  It's up to you if you want to do one or two sheets!  

In a large bowl, stir the wet ingredients (sugar through sunflower oil) together until well combined.  Place a sifter over the bowl, and add the dry ingredients (flour through cinnamon) and sift them into the bowl.  Stir together with a wooden spoon until a dough forms.  You can use your hands to knead in the walnuts and chocolate chips.  Or, separate the dough into two bowls and make one small batch of pumpkin chocolate chip and one of pumpkin walnut biscotti as I did.  Flour your hands (the dough is a little sticky) and form the dough into a log with squared-off ends, about three inches wide by about six inches long or so.  Here is my pumpkin chocolate chip dough log:


Bake your logs in the oven at 350 degrees for about 30 minutes, until they are firm-ish to the touch and look dry on top.  The baking time really depends on your oven, your baking sheets, etc.  Here are my baked biscotti logs:


See, they barely fit on the one baking sheet! Anyway, they aren't quite done here (I was using a lower temp oven and it wasn't cutting it, probably because of the pumpkin, which is why I recommend you use a 350 degree oven for the whole time), you can see they are still a little wet in the cracks, so I had put them back in the oven for a few minutes. 

Carefully transfer them (I use two large spatulas to pick the log up) to a cooling rack and let them cool for about 15 minutes.  


 You can see they look cooked enough here.

Then carefully transfer them to a cutting board (not the one you use for onion and garlic!) and slice them carefully across the width into biscotti!  Put cookies cut side down (they will be laying on their "sides") onto your baking sheet and bake 10 to 15 minutes until lightly browned on the bottom.  Take them out and flip them onto the other side and bake about 10 more minutes.  Let cookies cool on your rack and enjoy! They keep well packed in an airtight container for a few days, or wrap tightly in foil and freeze them if you made too many :-) 


We already ate half of them! Enjoy!